Around Thanksgiving, I was admittedly wasting time on Pinterest looking through the DIY/Crafts category (something I do quite frequently, to be honest...), and I stumbled upon this cute picture for making labels for homemade vanilla extract. I had no idea how vanilla extract was made, or that it could be made at home, so I began to research how to make vanilla extract.
The clearest instructions I found were on
Beanilla, a website that sells vanilla beans and other cool stuff. I decided that this was a really cool idea, so I talked to my dad about doing it for Christmas gifts. He loved the idea! So we began to look at cheap ways to get bottles and vanilla beans, since Beanilla was too expensive for our budget. After more research, I found a seller
(here) on eBay who sold vanilla beans for a lot less. We ordered some Madagascar Bourbon beans, 12 glass bottles, and my dad brought back two bottles of bourbon from Kentucky. We decided to use bourbon instead of vodka because we thought it would add a little depth and sweetness to the extract. Plus it sounded cool :)
 |
| all you need is 3 ingredients - vanilla beans, a bottle, and bourbon (or brandy or vodka) |
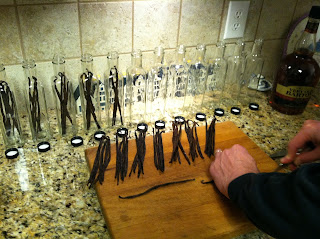
After everything arrived at the house, we got out the beans, split them into twelve groups of five beans each, and then cut them all lengthwise.
 |
| getting everything set out - had to try the bourbon first, of course! |
 |
| separate the beans into groups of five |
 |
| split lengthwise down the middle |
The beans themselves are really small - they're the little black dots inside the pod.
 |
| tiny beans! |
 |
| my dad, working on splitting the beans |
We put them beans into the bottles, and then filled the bottles with bourbon. Now, the extract has to sit for a while - at least 8 weeks - before it's ready for use.
 |
| tip - use a funnel. less spillage. |
 |
| at this point, it only smells like bourbon. |
Our next step was to make the labels. We were using my mother's Cricut and a ton of card stock to make our labels. The
Cricut, for those of you who don't know, is a die-cutting machine. It's fantastic. I love making cards with it. We decided on a simpler design after a few test runs - a tag cut out of patterned card stock, and on top of it, the same-sized tag cut out of vellum with the label part printed on it.
 |
| the card stock for the background |
 |
| cutting the vellum |
 |
| the assembled tags |
A couple weeks passed between the making of the extract and the labels, so the final product shown with the labels is much darker.
 |
| the final product!!! at this point, starting to smell a lot more like vanilla |
The most complicated part in the end was making the tag - mostly because we had to print on the vellum exactly where the Cricut was going to cut. Good thing I've got an engineer for a father... But all in all, it was a pretty simple project that was lots of fun. Best of all - it's the gift that keeps on giving! You can top it off with more alcohol as you run through it, and it will replenish itself.


No comments:
Post a Comment